การทำงานเป็นดังนี้ RasPBX รับ Fax เข้ามาทาง Inbound Routes (ผ่านทาง SIP Trunks ทั้ง G.711 Passthrough และ T.38 Fax Over IP) จากนั้นส่งไปยัง Fax Extensions ที่ได้คอนฟิกไว้ และจะส่งเข้า Email ที่ได้คอนฟิกไว้
ส่วนการส่ง Fax ออก เราจะติดตั้งโปรแกรม WinPrint Hylafax Reloaded ติดตั้งบนคอมพิวเตอร์ ส่งแฟ็กซ์โดยการสั่งปริ้นท์จากโปรแกรมต่างๆ เช่น Word, Excel, Acrobat, Powerpoint,... เป็นต้น
คงพอมองภาพออกนะครับ เรามาเริ่มกันเลยดีกว่าครับ
1. ติดตั้ง Hylafax, IAX modem และโปรแกรมอื่นๆที่เกี่ยวข้อง
คำสั่ง
- โค้ด: เลือกทั้งหมด
install-fax
รอสักครู่ (ใหญ่ๆ) ก็จะเสร็จ แล้วจะให้เราสร้างเบอร์ Fax Extension
HylaFAX installation finished. Fax extensions can be added any time
by calling:
add-fax-extension
Do you want to add a fax extension now [y/N]?
จะสร้างตอนนี้เลยก็ได้ครับโดยพิมพ์ y แล้วกด enter หรือไว้สร้างทีหลังก็ได้โดยพิมพ์ n แล้วกด enter
2. สร้างเบอร์ Fax Extensions
ให้รันคำสั่งนี้ครับ ** ห้ามสร้างจากหน้าเว็บ FreePBX เด็ดขาดเพราะมันจะไม่ซิงค์กับ Hylafax ครับ **
- โค้ด: เลือกทั้งหมด
add-fax-extension
ผลลัพธ์
RasPBX fax configuration script.
The following procedure adds an extension to FreePBX and connects
it with HylaFAX. Settings can be changed later by editing the
created configuration files.
Extension number [150]: ตั้งเบอร์ Fax Extension จะใช้ตามนี้หรือตั้งใหม่ก็ได้
Fax number: 023456789 เบอร์ Fax จริงๆ (ใส่มั่วๆได้ แต่เบอร์นี้จะโชว์อยู่บนหัวกระดาษแฟ็กซ์ตอนที่เราส่งแฟ็กซ์ออก)
Local identifier / fax name: Sale Department จะตั้งเป็นชื่อแผนกหรือชื่อบริษัทก็ได้
Forward received faxes to email address: iamaladin@gmail.com อีเมล์ที่จะให้ส่งแฟ็กซ์ไปเมื่อมีแฟ็กซ์เข้ามา
Country code [1]: 66 รหัสประเทศ
Area code [418]: 2 รหัสพื้นที่
Long distance prefix [1]: 0 รหัสกดโทรทางไกล ใส่มั่วๆได้
International prefix [011]: 001 รหัสกดโทรต่างประเทศ ใส่มั่วๆได้
Starting iaxmodem: iaxmodem.
Restarting iaxmodem: iaxmodem.
Restarting hylafax (via systemctl): hylafax.service.
faxgetty: no process found
Created symlink from /etc/systemd/system/multi-user.target.wants/faxgetty.service to /etc/systemd/system/faxgetty.service.
Your configuration has been successfully saved to these files:
/etc/iaxmodem/ttyI150
/etc/hylafax/config.ttyI150
/etc/hylafax/FaxDispatch
/etc/systemd/system/faxgetty.service
You can manually edit these files according to your needs.
Re-run this script with a different exension number to add
more fax extensions. Re-run it with the same extension number
to overwrite your configuration if you need to make changes.
Extension 150 has been added to FreePBX. Please finish your
configuration in FreePBX an click the red Apply Config button.
จะสร้าง Fax Extension อีกก็รันคำสั่ง add-fax-extension นี้อีกครับ
ไฟล์คอนฟิกของ Fax Extension
จากตัวอย่างการสร้าง Fax Extension ที่ผ่านมา ระบบสร้างข้อมูลไว้ในไฟล์ 4 ไฟล์ คือ
/etc/iaxmodem/ttyI151
/etc/hylafax/config.ttyI151
/etc/hylafax/FaxDispatch
/etc/systemd/system/faxgetty.service
เข้าหน้าเว็บ FreePBX ไปกดปุ่ม Apply Config
เบอร์ Fax ที่สร้างไปเมื่อกี้ จะเป็นเบอร์ IAX Extension บน Asterisk ครับ เห็นได้จากหน้าเว็บ FreePBX

เช็คเบอร์ Fax Extensions บน Asterisk
เช็คว่าเบอร์ Fax รีจิสเตอร์กับ Asterisk แล้ว โดยการรันคำสั่งนี้
- โค้ด: เลือกทั้งหมด
asterisk -rx "iax2 show peers"
ผลลัพธ์
- โค้ด: เลือกทั้งหมด
Name/Username    Host                 Mask             Port          Status      Description
150              127.0.0.1       (S)  255.255.255.255  4570          OK (2 ms)
1 iax2 peers [1 online, 0 offline, 0 unmonitored]
บนหน้าเว็บ FreePBX จะเห็นเบอร์ Fax Extension ด้วยครับ

การแก้ไขข้อมูล Fax Extension ที่เคยตั้งไปแล้ว
สมมติว่าเราอยากเปลี่ยนคอนฟิก Fax Extension เบอร์ 150 นี้ ทำได้ง่ายๆครับ โดยการสั่งรันคำสั่ง add-fax-extension ใหม่ แล้วใส่เบอร์เป็น 150
RasPBX fax configuration script.
The following procedure adds an extension to FreePBX and connects
it with HylaFAX. Settings can be changed later by editing the
created configuration files.
Extension number [150]: 150
Fax extension 151 has been configured previously. Do you want
to overwrite your existing configuration [y/N]? y
เบอร์ Fax Extension ไม่ออโต้เพิ่มให้
ระวังนิดนึงครับเวลาสร้างเบอร์ Fax Extension เพราะมันจะเริ่มต้นที่ 150 เสมอ (แก้ไขใน Code ได้) เดี๋ยวจะงงๆว่าทำไมสร้างได้แค่เบอร์เดียว
3. สร้าง Trunks ไว้รับและส่ง Fax
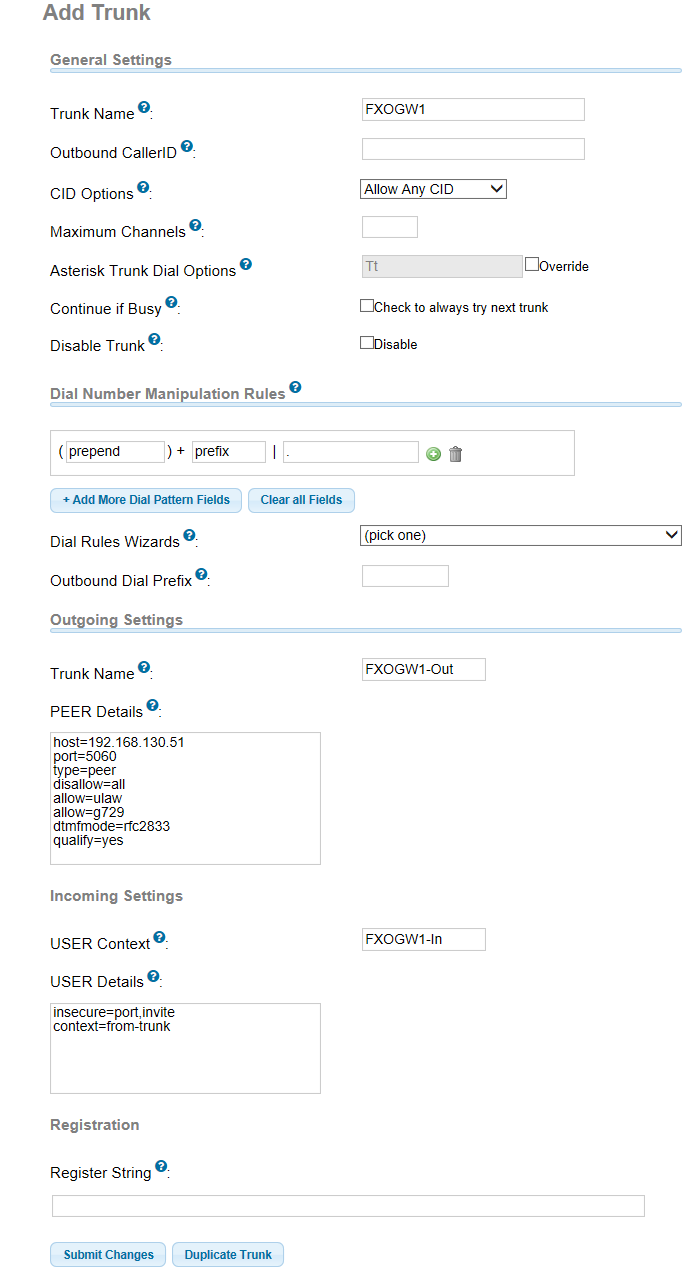
ผมจะสร้างเป็น SIP Trunk ครับ เพราะต้องเชื่อมต่อกับ SIP FXO VoIP Gateway ที่ต่อกับเบอร์โทรศัพท์ Fax อยู่
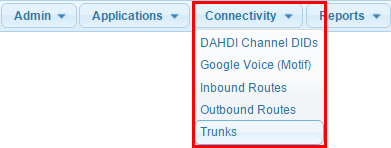
เข้าเมนู Connectivity -> Trunks


เอาหล่ะครับก็เป็นอันว่าขั้นตอนพื้นฐานได้ทำเสร็จเรียบร้อยแล้ว ขั้นตอนต่อไปเป็นการรับแฟ็กซ์เข้ามาและการส่งแฟ็กซ์ออกไป ผมขอยกไปไว้ในอีกบทความหนึ่งนะครับจะได้ไม่ทำให้บทความมันยาวเกินไป
บทความที่เกี่ยวข้อง
แนะนำ Raspberry PI เครื่องเล็กๆแต่ความสามารถไม่เล็ก
เทคนิคการติดตั้ง Asterisk + FreePBX บนเครื่อง Raspberry Pi
เทคนิคการติดตั้ง RasPBX ให้เป็น Fax Gateway ตอนที่ 2
เทคนิคการติดตั้ง RasPBX ให้เป็น Fax Gateway ตอนที่ 3
รวมเทคนิคการใช้งาน Elastix
รวมเทคนิคการใช้งาน Asterisk
รวมเทคนิคการใช้งาน Issabel
รวมเทคนิคการใช้งาน FreePBX
รวมเทคนิคการใช้งาน RasPBX - Asterisk on Raspberry Pi
